| This article pertains to Xenogears: the sub-database of Xenosaga Wiki. |
| This is being preserved here as the past work of a specific editor, writer, or translator. Due to this, it may contain spoilers and/or be edited differently than the rest of the wiki. |
The Call Of Babylon (How Tetsuya Takahashi And Masato Kato Smacked Religion In The Pooty)
To the Ethos HQ[]
What's the Tower of Babel? Guess you'll just have to find out. There's a good reason this page is dedicated to it. Not because it's incredibly long and difficult, because it's not (some might have difficulty at some parts that require precise jumping...), but it is very much a major piece of the plot which we'll get to in a few minutes.
Right now, you'll want to be making a side-stop to get Billy a cool new weapon. Return to the Orphanage and go to that special bookshelf again in the N room. Inspect it (this is the room Billy remembers being touched in by Bishop Stone, hence the dialogue when you inspect it), then push against the resilient bookshelf from the S to the N to open the secret closet. Push past repressed memories to the chest and open it to receive a B&J M686 GUN and though it doesn't say, some B&JM686AAMMO (that's not a typo, it's spelled just like that).
Get back on the Yggdrasil and if you like, get some precautions at the stores onboard. You can get more ammo for Billy's Gear and for himself (definitely get the G-M686A AMMO for Renmazuo's new handgun), you can restock on items, and you can upgrade Renmazuo's Frame by 1,200 HP. Remember, the Gear shop is N of the hallway and Ol' Maison's shop is S of the hallway. Go back to the Ethos HQ when you're ready to move on (NW of Orphanage and Tower of Babel).
Once in the HQ, go N through the golden gates, then W through that door to the hallway we were in last time. Here you'll have to fight some Assassins of some kind. The weird ones with the claws look like Jigsaw mixed with Wolverine. Anyway, kill 'em all with your superior playable character skills, then go W until you see the open door to the S stairwell. Go S into it and down the stairs. You'll have another battle here.
After that, go W and through the first N door, then up the stairs. In this room, open the bag to find a GOLD NUGGET, then go to the S room to find 2 chests with an AQUASOL DX and a SEAL AR. Go back down to the basement hallway.
Go E and take the first N hallway. To the E at the turn are 3 prison cells. The first has nothing, but the second has a guy from Shevat inside it! Since it seems Shevat is in our future, rescue him by talking to him. If you're interested, Big Joe is in the final cell. He just runs off when you let him out. Go back to the corridor and continue E. At the last door is a lift, which you must take down.
Go through the door at the bottom, then follow the hallway to the first door (and only side-door in the corridor) on the E. Your heart will burst from the excitement in this scene. Once you pull yourself together, leave the room, fight the dudes, then go out the N door to end this romp into the basement of a Masonic Temple (yes, they are watching, and waiting).
After all of the drama, you'll be able to form a party. You should probably bring Elly if you aren't opposed to that. Citan is mandatory. Bring whoever else (Billy), and save your game when you're adequately prepared. When you're done, head to the Thames, post haste!
Zeboim Ruins[]
After speaking with the captain, our short trip to the Thames is over. Get back in your seats on the Yggdrasil an' buckle up. Go to the dot on the map just N of your location. Once inside, Citan says "Get down". Listen to the good doctor and get down... on the elevator. If you by chance run into a freaky zombie mermaid monster (not the Shellbelle's, just to clarify), use an AQUASOL on it to cleanse the demon. Attacks will only heal it. Next, just keep going until you find a guard you can fight. Then go through that door and get down on another elevator. You should now be in a circular hallway with doors on the W, N, and E walls. The E door is the only real door. Take it, and cross the bridge.
Finish crossing the bridge and go up the stairs into the next hallway. Tip! You can tell if a door is fake or real by rotating the camera and looking at the ground behind it. If it is pitch black, that is a fake door, my friend. If there is a small halo of light behind it, it is a real door. You will find that there is only one way to proceed in these hallways, past several fake doors. When you reach the next guard, you know you're on the right, and only path. Fight him and enter the room he lost his life over.
Turns out it's another elevator. When you get out, open the chest on the left for some B&JM686AAMMO (by the way I just found this out. If you try to equip the same ammo over the identical ammo that's equipped, it prematurely reloads the gun, so don't do this unless you're out of ammo!). Fight the next guard and proceed through the door at the end of the hallway. Go W into the computer room and open the chest to get a SLEEP GUARD, then inspect the terminal if you like. Exit this room and take the S door, go downstairs, and proceed.
This next hallway is a short hallway to the W. Billy should observe the odd architecture on the other side of that short hallway through the doors. In the next real hallway, take a detour at the NW door. It's another computer room with a BLACK SNAKE in it. At the end of this hallway are 2 guards. Defeat them both and enter the E door at the very end of the hallway. It has a PANALPHASOL and a save point in it. Be sure to save, as bosses are imminent!
Now go through the N door just outside the save room. Downstairs is a door that reports it has been some odd hours since the emergency alarm has been tripped. I forget the number now, but I did the math and that's 4,000 years :O (hours/24-tells you how many days now-/365-how many years now). Select "Execute", then get this, we have to backtrack all the way to where you found the BLACK SNAKE and use the computer terminal there to unlock this door. Great, huh?!
After you reset the alarm, go back to the door and through it now. Make sure your character equip is optimum, maybe save your game again, and get on with it. If Elly is in the party you'll get an extra scene if you just head S at the room with the S and SW doors. She'll open the door further S automatically for you, so you can just go on. If Elly is not with you, you will go in the SW door first, use the console to open the door, then go S through that passage. Before you check the tube with the Troll in it make sure your equipment is ideal. If you want to be extra safe, you can equip ETHER VEILERs and wind or fire rings if you have any. Otherwise, just follow the strategy, you should be fine. Inspect MOMO Mizrahi! Er, inspect the tube!
BOSS: TOLONE AND SERAPHITA[]
DIFFICULTY: EASY
HP (TOLONE): 2500
HP (SERAPHITA): 2000
ITEM (TOLONE): VIT DRIVE
ITEM (SERAPHITA): ETH DRIVE
Have Citan use RENKI then SUISEII which will protect you from the bulk of Seraphita's (pink hair) attacks. Remember to heal when needed during this fight. After SUISEII focus on taking down Tolone. Use your best Deathblows and soon she'll be down. Now just remember to heal and you're golden. Take Seraphita down!
After the dynamic duo make their great escape, run alllll the way back to the first save point. It's the one that's not right at the top of the stairs from Tolone and Seraphita lol. Heal and save (use a tent or something), then continue back across that bridge. This..... looks scary.
BOSS: ID[]

DIFFICULTY: MEDIUM
HP: 3000
ITEM: NONE
This fight can kill you, if you bind yourself with pride. Don't try to show off here. Stick to a strict regimen of Id attacks-->AOE heal-->Deathblow-->Deathblow. Whatever order the heal and Deathblows takes is yours to adjust for your characters. Just don't let them hang under 200 HP for too long. 1 turn is too long. Draw on PLENTY of ZETASOLs if you have 'em. AOE healers are Billy with HEALING LIGHT and Citan with RENKI / SAZANAMI. He will go down in due time as long as you keep yourself alive. You shouldn't have to worry about his attacks as long as you heal everyone each turn.
Get the outta that place! On the Yggdrasil once again, DON'T go to Weltall yet. It's our next destination, but we've a task to attend to first. Prepare Elly's gear with the Ether setup if you want to abuse her power for the upcoming fight, and then Rico or Bart's Gear are your only other options. I recommend Rico's Gear for its brute strength over Bart's Gear's evasive antics. Suit up all your armor and such! The boss uses SEAL if you want to equip the armor for that. Make sure each Gear you plan on using has a means of restoring its HP. When you're ready, talk to Fei at Weltall simply by approaching it in the hangar. The fight against "Bishop" Stone commences!
BOSS: ALKANSHEL[]
DIFFICULTY: EASY
HP: 13,000
ITEM: E CIRCUIT
You will NOT damage Alkanshel at all at first. Just charge and smile as the rounds go by. There will be a cutscene.
After the cutscene you can now damage "Bishop" "Stein"'s mechanical monstrosity. Give it all ya' got and then some with Deathblows, Aerods, whatever. If anyone's HP gets yellow or close to it, be sure to restore their HP by using the Special Options tab with the right equipment on. If you think you're close to winning, make sure everyone's HP is over 600, give a little. The boss's death throws will cause 600, give a little, HP damage to all. If you haven't experienced it yet, a dead character won't receive any EXP, and that sucks, especially with a high payoff like this fight. That's about it. You'll blast through 13,000 HP soon enough. Just watch your HP.
After the scenes, you have some options to consider before approaching Babel Tower. You may, in either order, upgrade your Gears in the hangar on-board OR make your final purchases of ETHER DOUBLERs OR HOLY PENDANTs from Nisan, as they are about to be gone from the game for good. That's right.
ALL ETHER DOUBLERS AND HOLY PENDANTS ARE ABOUT TO BE FOREVER UNPURCHASABLE IF YOU HAVE NOT PURCHASED ANY YET!!!
...So I recommend using that 30,000 G you just got from Alkanshel and any other G you have saved up to go get 1 or 2 ETHER DOUBLERs or HOLY PENDANTs, which, once again, double the amount of EP you consume to do twice the effect and double the length of status buffs respectively. These pieces will help very much in the future. You can actually get the doublers later on via a point system in the Kislev Gear Battling Arena, but that sucks. To get to Nisan you need to approach the NE continent from the SE corner, then go NW to the solitary tree. OK. Stepping off the soap box here.
Whether you get the extra equipment or not, this is what you do. Upgrade your Gears in the hangar on the Yggdrasil with any leftover cash you have. Remember, it automatically sells your outdated parts that you're replacing, so you have more G than you think you do when upgrading Gears. These are top-notch upgrades though. Even if you run out of cash while upgrading, I highly recommend that you find the cash to finish upgrading everyone you can. At least upgrade who you plan on using most. Since these upgrades are so drastic, you know we're going to need them coming up.
I went back up and spent an hour in the desert around Aveh only to find that in the area real close to Kislev there is a small spot of the desert where 2 mech crab-things frequently attack. They drop 1,000 G per fight as well as MAGNETIC COATs, worth 2,000 G when you sell them. Hunting for G here is probably what you want to do.
The next destination is Babel Tower, in the center of the Aquavy region in the SW corner of the map. You may have seen it. You can't miss it if you're passing nearby. I dunno, I guess if you REALLY can't find it, just check all of the yellow dots on the SW corner of the world map. Make sure before you go in that you are set up for a long adventure. You're going on a long adventure.
Babel Tower[]
So you go E. Simple enough so far, right? You'll have limited camera angles inside the tower, and it's annoying. If you fall, it's also annoying, but you can recover by climbing the junk on the W wall.
Follow the vent until you see the opening in it and drop in. Open the chest to get an ETHER AR, then jump S across the platforms. When you can go W, do it, and drop to the chest with an EARTHVEIL AR, then grab the LITE AR+1 as you climb back up (it's along the W wall, you should be able to see it). After grabbing those 2 treasures, go back to the junction but go S instead.
You'll pass through a short tunnel and then be confronted with your first challenge. A rope. You gotta swing across it buddy. Adjust the camera angle before you jump. The real trick is getting on the rope. The sharp angle sticking out of the platform you're on seems to point right at it. Once you're on, it will give you directions on how to swing across. Basically, just press left and right, then jump off when you've got a good swing going. This turns out to be a hard jump. Just keep in mind that you only jump off one direction, so it's mostly about getting the good swing. Just keep that left and right going. Do it for, I dunno, 30 seconds if you want to be safe. You'll have to climb back up, of course, if you fall, and try again...
Once across, continue to climb. Stop when you get near the top of the crane though. You'll notice that it's cracked partway up? Stepping on it after that crack with make it bend down and dump you off, then will reset its position. You need this device to proceed however. Do this - angle your camera so that you can run straight left and right on the crane arm. Jump on the part that drops, then jump off back to the safety of the previous place. See how it works? Now look ahead to the next vent we're trying to jump to. Looks doable sure, but can you get on top of the vent? If you can, you'll find a chest with a THUNDERRODG for Elly's Gear. Either way, get in the vent and jump onto that connected rope to get to the next area, and a save point!
To the W is a small door which you can only enter on foot. Use the ![]() and
and ![]() buttons to get out on foot, then proceed through the door. Go ahead and take the GOLD NUGGET from the chest, then inspect the wall with the giant display on it. Next, get on the thin ledge above one computer, between the chair looking object on the wall and the actual computer, to inspect the blinking red light on the small computer nearby. It will summon a lift! Jump up and open the oddly placed door to return to the last area...
buttons to get out on foot, then proceed through the door. Go ahead and take the GOLD NUGGET from the chest, then inspect the wall with the giant display on it. Next, get on the thin ledge above one computer, between the chair looking object on the wall and the actual computer, to inspect the blinking red light on the small computer nearby. It will summon a lift! Jump up and open the oddly placed door to return to the last area...
Reboard your Gears, save again if you like (there's a boss coming up!), and drop down W off the ledge. Proceed on the thin path to be moved to the next area. There, jump up the stacked boxes and open the chests to get an ETHER AR and a BEAM JAMMER. Take Fei's advice and exit the Gears, climb the ladder from either side to the top, then walk across the rungs to the door and go through.
Up here open the 2 chests for more treasures from beyond the grave, a GOLD NUGGET and an OLD CIRCUIT. Prepare for a Gear battle! Jump up to the chair of the S computer and inspect it for a cutscene and the boss fight!
BOSS: WYVERN[]
DIFFICULTY: EASY
HP: 5,000
ITEM: NONE
I used Aerods with an ETHER DOUBLER on Elly's character equip (don't know if that helps or not but why the hell not right?) and a POWER MAGIC + E CIRCUIT X2 for her Gear equip and won the fight, doing over 6,000 damage right off the bat. I know that doesn't help you folks who don't use the Elly setup, so I recommend avoiding any Mirror Stances which might come up, using that time to heal, and do more damage to Ramsus' Gear than Miang's can heal it for. Don't forget the magic of FRAME HP##s!
Meeting Maria[]
Save after the fight and enter the S door. Follow the straightforward path and drop down first chance you' get to find a chest with a GROUND in it, then exit your gears and enter that small door in the pit.
Make a long N leap across the stair-looking slope to a chest with an O2 CYLINDER, drop W off that ledge to a chest with a GOLD NUGGET, and run S to the opposite side to find a chest with an E CIRCUIT in it. Use the N most console to open a door lock up ahead. Using the 3rd console down from N to S will show a seemingly important scene with an exterior mirror being moved. The scene is repeated if the console is activated again. It's not important at this time, but later on it may just be. Just return to the top, in the pit, reboard your Gears, jump up the pipes, jump across the pit, and continue down the hall.
Go ahead and plummet down the next shaft you find. When you land, go N to 2 chests with a VEIL DOUBLER and WIND VEIL AR. Make your way S to get away from this new pit. You will eventually notice that there is a path to climb up and go back N on. Don't take that, that's just the path if you had cleared the last pit, and it leads back the way we came. Continue S.
How's your Fuel and HP doing, btw? Some not so great? Well, all I can say is turn your conservative mode on now. Charge every turn you can spare to and use FRAME HP##s to restore HP with any Fuel you've saved. Should you come across a random encounter with an opponent called Fuel Tank, don't attack it immediately. This thing only hurts you if you hit it first. Take this golden opportunity to charge charge charge and heal heal heal via Frame HPs. Once you're good as new, be sure to hit it with heavy attacks since it tends to self destruct with damage to the party. If worse comes to worse, you'll have to crawl out of the tower the way you came, recharge, and re-attempt your ascent. But even if it looks BAD you should be OK for a while.
Be careful when you reach the room with the circle platform in the middle not to fall. I dunno what happens, but I imagine it sucks and you have to run all the way back.* Get the nearby chest with the ICE RODG for Elly's Gear, then jump across S and open that chest with the FIRE VEIL AR. Jump through the S exit to proceed. *{Note from Wiki editors: while we are still preserving the original text of this walkthrough, another player has confirmed you cannot fall in this room.}
Oooh finally, a climbing area. Use the repair-bot to the W and N at the bottom of the climb to restore Fuel and HP! Then head S, over the section in your way, to the chest under the platform, which has a STONE RODG. Go back N and climb the bronze colored "stairs", crossing the bridge S. Drop down onto the S area and carefully jump onto the green circle platform which when landed upon, will promptly trigger a battle with some pests. After the fight, the platform will raise you a level. Jump off when it reverses direction at the top.
At this new height, go N across the ledges until you find another green elevator, which will also force a fight upon landing on top of it. You'll have to make a long jump first, but when you can get on that elevator. DO NOT make straight for the chest on the nearby ledge! Activate the elevator first, THEN jump to the ledge. You still need to activate the 2nd elevator to get to the ledge with the G-M10S AMMO in the chest for Billy's Gear. Ride on up!
Head S once again, and when you pass behind the broken wall check around for a chest with a GOLD BULLION in it. Continue S. You'll soon find a 3rd elevator to fight/activate/ride. Ride it to the next zone!
Same game here, new design. You must be informed however, that should you fall, you will have to redo ALL 3 of the elevators you just climbed, fights and all. DON'T MESS THIS UP! Go N under the semi-arches until you pass by another broken wall segment. It is hiding a chest with G-GG060 AMMO. Equip that. Keep going N until you can go up a little more. You should see a dark corner all the way N and E. There's a chest in there with a FLARE RODG for Elly's Gear.
Drop down and line up your shot for elevator #4. Remember, if you mess this up, it's back to the beginning. Up top, jump S to the chest with the WATERVEIL AR in it. You have to make one final jump. Look for the last green circle elevator on the wall just S of that chest. It's lower than your present altitude, but it will take you where you need to go. Look at the pattern on the wall it's attached to in order to know how to line up your jump. Climb the ledge E as far up as you can go. Don't press against the wall, give yourself a little space from it, then jump S until you line up with the pattern on the wall and safely land on the elevator. That pattern will point you straight to the lift. Obviously now, use it to jump further S and approach the large wires to climb to the top of this tower!
Save the game! There's a big Gear boss coming up again.
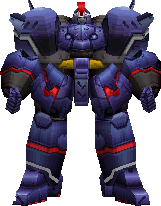
BOSS: SEIBZEHN[]
Seibzehn.
DIFFICULTY: EASY
HP: 6,000
ITEM: ETHER AR+1 OR HEAVY ALLOY OR NOTHING


Maria.
I defeated it with Aerods and the Ether+ equipment setup for Elly, defeating it in one shot. If you want a no-nonsense approach, that's the way to do it. If you like to draw things out though, don't be disappointed when I say that all you really need to do is use Deathblows and heal if you get low on HP. Seibzehn won't be too tricky. Even if you don't have an awesome Ether+ setup as mentioned earlier in several places in the Walkthrough, Seibzehn is STILL weak to Ether attacks.
You'll be in (on) Shevat!