| This article pertains to Xenogears: the sub-database of Xenosaga Wiki. |
| This is being preserved here as the past work of a specific editor, writer, or translator. Due to this, it may contain spoilers and/or be edited differently than the rest of the wiki. |
Gettin' Back To Your Roots (Meanwhile, Back On Earth...)
Gate Generator #1 AND The Liberation Of Aveh![]
So you're in Nisan. Clear the town of guards. There are 5 encounters to complete. I suggest training your 7 AP Deathblows on these guys. You may have to move closer to the center of town to find the last 1 or 2 guards. After that, you'll reach a junction where you need to select a 3rd member for your party. It will be Fei, Bart, and whomever you choose. Select Citan for some additional dialogue. He can't come along. Anyone else is OK though. The choice isn't so important this time.
The shop is just to the E if you want to purchase some backup. Save if you like, then go back to the Nisan map out the W or E exits and circumnavigate the path to the Margeoleum (talk to Margie). Descend the stairs!
When given the option to prove your worth as a man or to cast aside all faith in your ability to represent, select whichever fulfills you as a person. If you decide to stand up for who you are, you will find a panel in the NE by the curved wall which will open the way forward. Inside that door is a tough battle. If you don't have quick heals, you'll have to rely on your muscle and items to get through it. If you're muscling it, take down the front line soldiers quickly. Keep revived if you lose members and keep hacking at them. It's hard to multitask if you're getting whooped, but trust me, eliminating their offense is the quickest way to recover and finish the fight.
After that, head N toward the center of the room and use that console to go up to the second floor. Just follow along until the true nature of the Fatima Jasper is revealed. Afterward, proceed until the junction, then go W to find an interesting room and a save point. There is also a DESERT WORM, a weapon for Bart, in the chest nearby. Whether you go out the N or the S exit, head E and go through the door and up the elevator to get on with it.
A tad bit W the path will diverge N or S. Pick one. Really. Either is fine. Just follow the path until it circles around to the opposite direction you took and you'll find a door that goes dead E (position your compass so that N is on the top to easily tell which door goes dead E). Take it E to find a chest with a DEATHBLOWER1, then go back the way you came. So many worthless rooms in this area that you can easily lose a lot of time exploring them. This is the only treasure here. Take the door which goes NE now.
Follow the path until you see a door going NW. Inside is another save point and another place to use the Fatima Jasper. Use it and save, then go through the door just SE of that room. You'll be in a huge circular room. Go S and through the SW opening to find something really special. It's named Andvari, and it's here to replace Brigandier! Go under and between its legs to find a control panel and an accompanying cutscene.
When that's over, go back the way you came. Out to the hangar, NW to the hallway, SW and through the door, NW to the end of the hallway and through the door to the No. 2 Elevator Block, SE and E to the elevator and down you go. Go W and either N or S, but continue W and enter the control room at the end of your chosen path. The dude in here will sell you the same shit from Nisan. I can't imagine you've run out of anything, but if you have, stock up on it. Use the control panel on the W side of the room to do something important. Save again if you like (or keep being a daredevil, you maniac), and go out one of the 2 doors N or S.
There will be guards outside waiting to pummel you, so be ready. Go E and up the elevator. You will encounter more guards, so make sure you healed up. After the fight, go N at the junction and keep following the path E. More battles! Yay! Fight your way to the NE door (we were just here earlier) and go through it. Again, fight through the guards. After the scene with Shakhan and the Fatima Jasper once again (lol Sigurd: We running out of time! All your base are belong to us! lol), save the game (daredevil?), then exit the room and continue E and through the door.
You'll eventually fight some Neo Etones. They're easy enough, with 3,000 HP each. Use ![]() attacks and level 1 Deathblows. Hopefully you'll get SEAL BARRIERs after the fight. If not, you have a chance to get one or two in the next battle. They will come in handy soon. Any Seal defense will come in handy soon.
attacks and level 1 Deathblows. Hopefully you'll get SEAL BARRIERs after the fight. If not, you have a chance to get one or two in the next battle. They will come in handy soon. Any Seal defense will come in handy soon.
After the cutscene, you may switch party members by speaking with them (Bart must remain in the party). Citan is available once again. Take whomever really, upcoming strategy pretty much only depends on Seal defense. I took Elly with a full ether setup (Elly + full ether setup = win). However, if you lose the Shakhan boss battle with Elly, Maria is recommended - her Gear is VERY powerful. You'll want to heal your Gears and save at the shop near the center of Nisan.
On the overworld map (outside of Nisan), head W toward a cave. Inside of the cave defeat the 2 Neo Etones however you like, then equip any SEAL BARRIERs you may have accumulated. If you want to be extremely prepared, you can also go back to Nisan, heal your Gears after the Neo Etone fight, and save. Proceed N and through the door when you're ready for the big boss.
BOSS: SHAKHAN[]


DIFFICULTY: MEDIUM
HP: 18,000 (max of 20,000 when fully healed)
ITEM: ETHER AR+1
While he's tethered to the generator he will not be able to retaliate. You will also do minimal damage, so don't waste fuel on high-strength ![]() attacks.
attacks.
Booster everyone.
Use Aerods (if you have the ultimate-ether-elly-win setup) every time it's Elly's turn. Otherwise, use level 1 Deathblows (lol strategy for this entire game, I'm telling you...) to keep the damage on. Shakhan will absorb HP from the gate generator while he's attached, so be ready to do more than 20,000 damage. If you have the super-ether setup for Elly, then this match won't last more than 3 rounds. If you don't, then I hope you brought frame HP restoring options or Maria. Either way, the strategy consists of you attacking hard and healing hard. In short - Aerods (if you're set up for that), level 1 Deathblows and restore your frame HP if it dips too low. Also, you need to have the best upgrades if you don't have them yet. Upgrades are important!
Make S for the exit after the fight to see the next scene. You will soon be in control of the Yggdrasil. If you want to clean house on Hob-Meat-Type items, then return to the newly liberated Bledavik in the middle of the desert (you start near it). Find the kid you gave 1,000 G to for robbing a woman and he'll sell you Hob-Meat-Type items. If you wait while the items are on screen you'll be able to drop the price a few G. If you want to move onward however, take Yggdrasil to Babel Tower.
A Showdown Against The Elements (Gate Generator #2)[]
Save the game. Then enter the SE door. When you have the choice of arranging your party, take anyone except Chu-Chu. Maria and Bart are good options to take. Whether or not you can successfully use Chu-Chu in an upcoming battle strategy is irrelevant. Chu-Chu takes away from the seriously awesome storyline of this game, period. Do not take her.
When you control the Babel Tower party again, make sure you have your optimum Gear equipment on (super-ether Elly?), follow the path until it drops down, then exit your Gears and go through the N, human-sized door for a cutscene and a subsequent Boss fight.
")
")
")
")
BOSS: BLADEGASH AND MARINEBASHER[]
DIFFICULTY: EASY
|BLADEGASH|
HP: 4,000
ITEM: EP DRIVE
|MARINEBASHER|
HP: 5,000
ITEM: ETHDEF DRIVE
Aerods ftw. What's this??!! Aerods won't defeat Marinebasher! Well that's just great. Why didn't my Aerods win? Simple elemental affinities, my dear reader. I must have had something equipped that allowed my Aerods to heal Marinebasher instead of harm it. If you had this issue too, use Aerods anyway to get rid of Bladegash or Marinebasher, then focus on beating the life out of the lone survivor. Level 1 Deathblows. You can do it!
BOSS: SKYGHENE AND GRANDGROWL[]
DIFFICULTY: MEDIUM
|SKYGHENE|
HP: 5,000
ITEM: ETH DRIVE
|GRANDGROWL|
HP: 6,000
ITEM: VIT DRIVE
Go ahead and use WILD SMILE on the bird-bot. Use those level 1 Deathblows as well. Try to use your options to restore Frame HP, as you'll need to be in good shape for another upcoming battle.
BOSS: BLADEGASH AND MARINEBASHER ROUND 2[]
DIFFICULTY: EASY
|BLADEGASH|
HP: 4,000
ITEM: EP DRIVE
|MARINEBASHER|
HP: 5,000
ITEM: ETHDEF DRIVE
It's the same battle as before. You may be weakened! But your offense is still strong! Aerods, and clean up with level 1 Deathblows! Restore Frame HP if you can afford to! Go all out. This is the last consecutive battle you'll have to face with these 2 Gears for now.
BOSS: SKYGHENE AND GRANDGROWL ROUND 2[]
DIFFICULTY: MEDIUM
|SKYGHENE|
HP: 5,000
ITEM: ETH DRIVE
|GRANDGROWL|
HP: 6,000
ITEM: VIT DRIVE
Also the same as before! Keep your Frame HP up if you can (hopefully you took care of that while Grandgrowl was the only target last time) and follow the exact same pattern. WILD SMILE Skyghene and beat it down first, then whoop on Grandgrowl.
If you make it through all of that madness, then you'll be entitled to some cutscenes. Save on the Yggdrasil, then let's make for our buddies at the Thames.
The Little Girl Who Could (Gate Generator #3)[]
On the Thames, use the screw elevator to go to the 4F Bridge. Speak to the "Captain" to knock the story up a notch so we can go to our next destination. Before leaving, drop by the B1F Supply Entrance to utilize the Gear shop in the NE corner. Upgrade everyone you can, but if you are limited on what you can buy, then some good choices would be to fully upgrade Weltall, Seibzehn, and Vierge (if you tend to like using Vierge). Go to the B2F Dock, board the Yggdrasil, and speak with Bart's secret brother on the Bridge to be whisked away to fame and fortune.
Mmmmmmmk.... We're gonna call forward "N" and backward "S", though there are no compass directions available for us here... Also, use jumps to propel your Gears faster through the "water". Go "N" until you get a chance to turn "E" (right). Go "E" until the next area loads.
Cardinal directions are no longer important at this point. Just go forward through this curvy tunnel until the junction, and go right at the junction. At the next screen, you have to keep going forward and jumping to get to the save point area. Once you're there, open the chest to get a MERMAID MAIL (I think only females can wear it), then save the game. Jump back down the hole and return the way you came until you get back to that juncture. Take the left path deeper into the lair.
You will notice that there is a force pushing you back as you move ahead on this path. Just keep jumping ahead and aim to the left to get to the only path we can take at this time. Keep going until you eject on a surface. Open a chest to get a DARK ROD. The other chest is empty, but somehow stops the water flow from the opposing tunnel. Hmm. Just go back to the junction and go down the right path this time until you eject again.
This is the room before this Generator's Boss, so open the chest to get the DEATHBLOWER2 (!) then equip it on your heavy-hitter, whoever that may be. Also, equip Ether Defense increasing equipment. You'll want to stack as much Ether Defense on your Gears as possible while keeping Frame HP restoring options and having DEATHBLOWERs on. When you're prepared, go through the door to find danger! Dammit, danger!
BOSS: CRESCENS[]
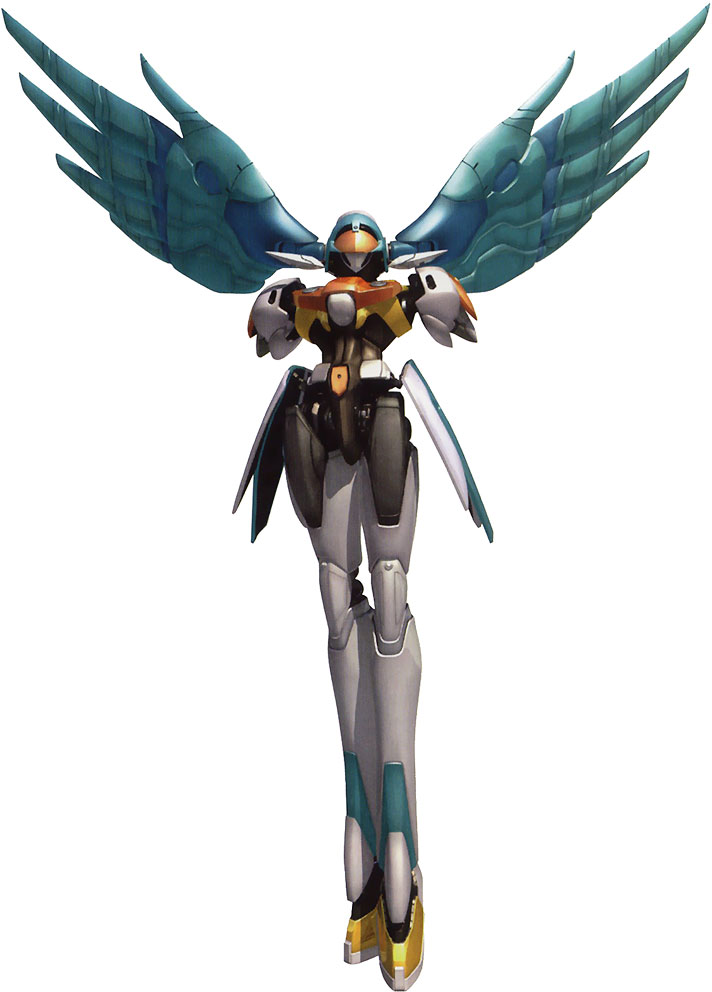

Crescens, the one Gear which appears to be on a balanced diet.
DIFFICULTY: EASY
HP: 14,800
ITEM: NONE
Well, I hope you weren't TOO out of shape when this fight began. If you find you fail the first time, you can go back to the Yggdrasil from the last save point and change up your party if you need. Most of your ![]() and
and ![]() attacks will miss, so use only
attacks will miss, so use only ![]() attacks and whatever level of Deathblows you choose. I suggest level 2 with the person who equipped the DEATHBLOWER2 and level 1 for everybody else. Repair Frame HP as needed. Just before you dip into yellow HP is generally a good time. You will likely soon win the fight. Oh, and WILD SMILE won't help you here.
attacks and whatever level of Deathblows you choose. I suggest level 2 with the person who equipped the DEATHBLOWER2 and level 1 for everybody else. Repair Frame HP as needed. Just before you dip into yellow HP is generally a good time. You will likely soon win the fight. Oh, and WILD SMILE won't help you here.
You'll receive the good news that Solaris is now accessible and wind up on Shevat near the Queen's place. Go to her chambers and give the nod to proceed to Solaris on the back of the Magical Robot Seibzehn.
WARNING: You will be entering the point of no return for Disc 1. A, let's say, MAJOR, change in the game will be taking place, and you will be unable to do several of the important side quests (card game, badges, etc) after said change. So only go if you're ready. Your party will be selected for you, but don't worry, it's an all-star cast. Citan finally decides to take his lovely weapon with him, but he won't be able to use it until he gets a badass scene to whip it out in. Also, Emeralda will now be playable (if you aren't on Solaris yet or after Solaris). That's about all you need to know before we move on, I think.